Setting Up
Virtualization
- Virtualization is an abstraction of physical computing resources.
- The main advantage of virtualization is the abstraction layer between the physical resource and the virtual image.
- One of its key goals is to enable the execution of applications on systems that would not normally support them.
- In the context of virtualization, we typically distinguish between:
- Hardware virtualization
- Application virtualization
- Storage virtualization
- Data virtualization
- Network virtualization
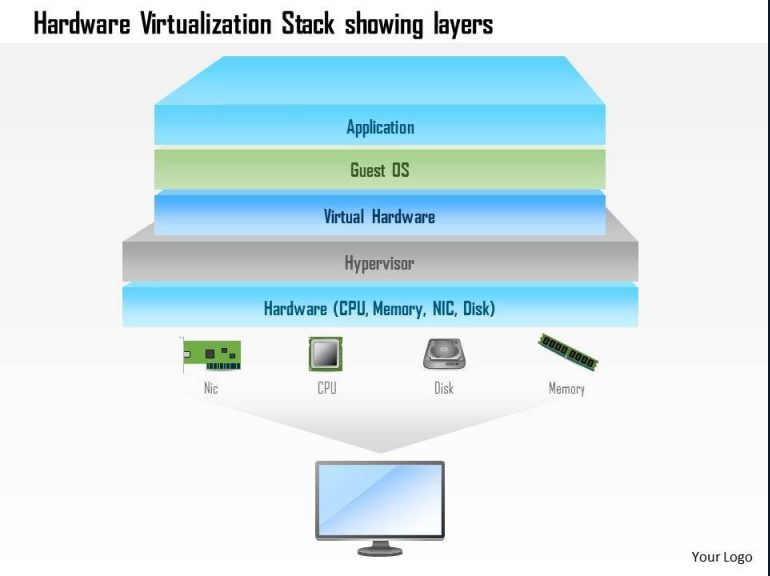
Hardware Virtualization
- Hardware virtualization refers to technologies that allow hardware components to be accessed independently of their physical form through the use of hypervisor software.
- The best-known example of this is the virtual machine (VM):
- A VM is a virtual computer that behaves like a physical computer, from its hardware to the operating system.
- Virtual machines run as virtual guest systems on one or more physical systems referred to as hosts.
- VirtualBox can also be enhanced with VirtualBox Guest Additions, which are a set of drivers and system applications designed to enhance the performance and usability of guest operating systems with VirtualBox.
Virtual Machines
- A virtual machine (VM) is a virtual operating system that runs on a host system (an actual physical computer system).
- The physical hardware resources of the host system are allocated via hypervisors.
- A hypervisor manages the hardware resources, and from the virtual machine’s point of view, allocated computing power, RAM, hard disk capacity, and network connections are exclusively available.
- In simple it is a software that creates and runs the virtualization.
- It allocates and controls the sharing of a machine’s resources; including storage space, RAM and CPU’s.
- From the application perspective, an operating system installed within the VM behaves as if installed directly on the hardware.
- VMs offer numerous advantages over running an operating system or application directly on a physical system:
- Applications and services of a VM do not interfere with each other.
- Complete independence of the guest system from the host system’s operating system and the underlying physical hardware.
- VMs can be moved or cloned to other systems by simple copying.
- Hardware resources can be dynamically allocated via the hypervisor.
- Better and more efficient utilization of existing hardware resources.
Introduction to VirtualBox
- We can install VirtualBox from the command line, or download the installation file from the official website and install it manually.
.PNG)
- VirtualBox is very common in private use.
- The installation is easy and usually requires no additional configuration for it to launch.
- We can download VirtualBox from their homepage: https://www.virtualbox.og/
.PNG)
- Alternatively, with Ubuntu Linux we can use the following commands to install both VirtualBox and the extension pack simultaneously:
sudo apt install virtualbox virtualbox-ext-pack -y - The VirtualBox extension pack enhances the overall functionality of VirtualBox with the following features:
- USB 2.0/3.0 support
- VirtualBox RDP
- Disk Encryption
- PXE Boot
- NVMe support
.PNG)
Proxmox
- Proxmox is an open-source, enterprise-grade server virtualization and management platform which utilizies Kernel-based Virtual Machine (KVM) for full virtualization and Linux Containers (LXC) for container-based virtualization.
- This software is used in businesses and large data centers.
.PNG)
- Proxmox provides three main solutions which can be downloaded here:
- Proxmox Virtual Environment
- Proxmox Backup Server
- Proxmox Mail Gateway
- Proxmox VE ISO Download
.PNG)
- This software allows us to build and simulate entire networks, including complex setups using any type of virtual machine or container you can think of.
- We can download the Proxmox VE ISO file and install it on VirtualBox to experiment with it without the need for additional hardware resources.
- Proxmox VE Installation:
.PNG)
- Once everything is set up, we should double check all the stats. If everything looks good, we now can start the VM.
.PNG)
- When the VM boots up, we’re greeted with the Proxmox Virtual Environment screen. Now, we can select the option to install Proxmox VE using the graphical interface.
.PNG)
- Pay close attention throughout the duration of the setup, and make sure to read everything through the installation. Once it’s installed, you will see the login screen, along with management webpage’s URL.
.PNG)
- The same credentials you used during the installation will be used to log into the web dashboard. Your credentials will be root:yourpasswd.
.PNG)
- At this point, you should see all the configuration options for your virtualized “Datacenter”. This is where you can upload VMs, containers, create networks, and much more. Those VMs and containers will be inside virtualized Proxmox environment and do not need to be added independently to VirtualBox.
.PNG)