Web Requests
Web Requests
HyperText Transfer Protocol (HTTP)
- Most internet communications are made with web requests through the HTTP protocol.
- HTTP is an application-level protocol used to access the World Wide Web resources.
- The default port for HTTP communication is port 80.
- It is considered insecure.
- Uniform Resource Locator (URL)
- Resources over HTTP are accessed via a URL:

- Resources over HTTP are accessed via a URL:
| Component | Example | Description |
|---|---|---|
| Scheme | http:// https:// | This is used to identify the protocol being accessed by the client, and ends with a colon and a double slash (://) |
| User Info | admin:password@ | This is an optional component that contains the credentials (separated by a colon :) used to authenticate to the host, and is separated from the host with an at sign (@) |
| Host | inlanefreight.com | The host signifies the resource location. This can be a hostname or an IP address |
| Port | :80 | The Port is separated from the Host by a colon (:). If no port is specified, http schemes default to port 80 and https default to port 443 |
| Path | /dashboard.php | This points to the resource being accessed, which can be a file or a folder. If there is no path specified, the server returns the default index (e.g. index.html). |
| Query String | ?login=true | The query string starts with a question mark (?), and consists of a parameter (e.g. login) and a value (e.g. true). Multiple parameters can be separated by an ampersand (&). |
| Fragments | #status | Fragments are processed by the browsers on the client-side to locate sections within the primary resource (e.g. a header or section on the page). |
Not all components are required to access a resource. The main mandatory fields are the scheme and the host, without which the request would have no resource to request.
- HTTP Flow
- The first time a user enters the URL (inlanefreight.com) into the browser, it sends a request to a DNS (Domain Name System) server to resolve the domain and get its IP.
- DNS is nothing but a translator, changes the domain to it’s simplest form, which is an IP address. computers uses ip’s to communicate.
- The DNS server looks up the IP address for inlanefreight.com and returns it.
- Once the browser gets the IP address linked to the requested domain, it sends a GET request to the default HTTP port (e.g. 80), asking for the root / path.
- Then, the web server receives the request and processes it.
- In this case, the contents of index.html are read and returned by the web server as an HTTP response.
- The response also contains the status code (e.g. 200 OK), which indicates that the request was successfully processed.
- The diagram below presents the anatomy of an HTTP request at a very high level:
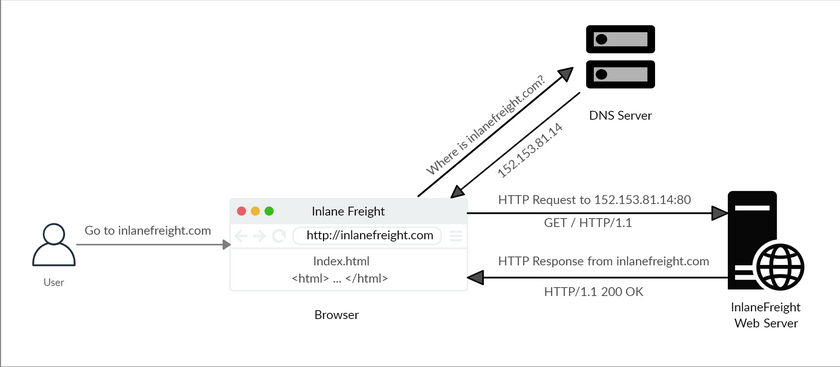
Note: Our browsers usually first look up records in the local ‘/etc/hosts’ file, and if the requested domain does not exist within it, then they would contact other DNS servers. We can use the ‘/etc/hosts’ to manually add records to for DNS resolution, by adding the IP followed by the domain name.
- cURL
- One of the most important tool, in web exploitation.
- cURL (client URL) is a command-line tool and library that primarily supports HTTP along with many other protocols.
- We can send a basic HTTP request to any URL by using it as an argument for cURL, as follows:
katt02@kali$ curl inlanefreight.com <!DOCTYPE HTML PUBLIC "-//IETF//DTD HTML 2.0//EN"> <html><head> - cURL does not render the HTML/JavaScript/CSS code, unlike a web browser, but prints it in its raw format.
- We may also use cURL to download a page or a file and output the content into a file using the -O flag as follows:
katt02@kali$ curl -O inlanefreight.com katt02@kali$ ls index.html-O: specifies the remote server, which in this case is inlanefreight.com
Hypertext Transfer Protocol Secure (HTTPS)
- From above, we touched on HTTP. However, one of the significant drawbacks of HTTP is that all data is transferred in clear-text. It is not encrypted. Making it vulnerable to the threat-actors!. This could be done by performing a Man-in-the-middle (MiTM) attack to view the transferred data.
- To avoid this issue, the HTTPS (HTTP Secure) protocol was created, in which all communications are transferred in an encrypted format, so even if a third party does intercept the request, they would not be able to extract the data out of it.
- HTTP & HTTPS Overview:
- I have highlighted what using the http protocol expose.
- In contrast to this, meaning; using HTTPS Protocol:

- As we can that the same data is now encrypted.
- HTTPS Flow
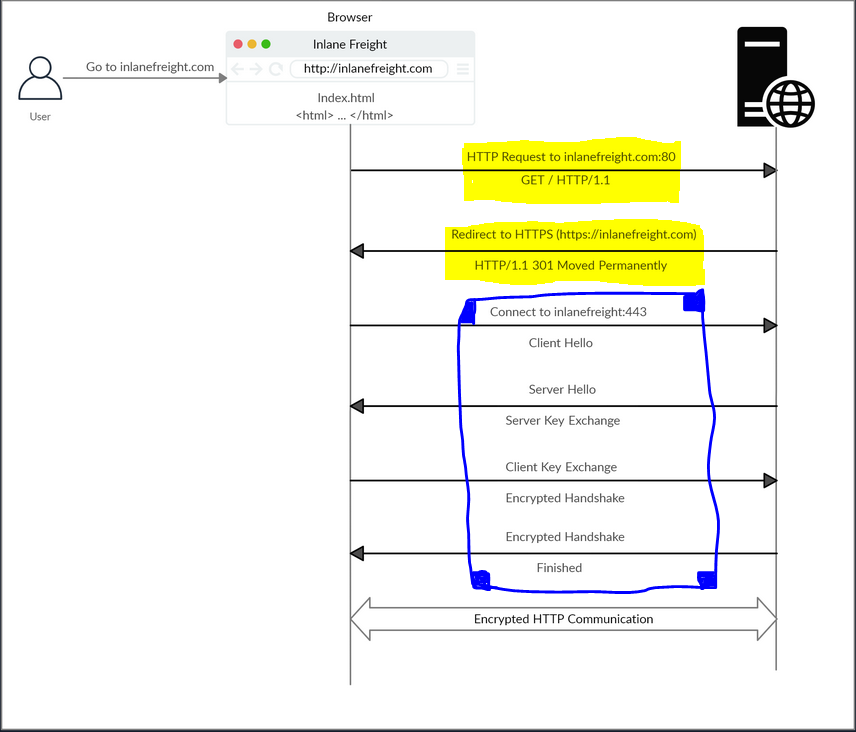
- The part that is highlighted by yellow, is a request of http, and we see that we get 302 status-code, implying that website has been permanently moved.
- This is because we have encrypted the website now. We see that in the blue highlighted part.
- Next, the client (web browser) sends a “client hello” packet, giving information about itself. After this, the server replies with “server hello”, followed by a key exchange to exchange SSL certificates. The client verifies the key/certificate and sends one of its own. After this, an encrypted handshake is initiated to confirm whether the encryption and transfer are working correctly.
- Notice that:
port 80indicates that the site is using http.port 443indicates that the site is using https.
- cURL for HTTPS
- cURL automatically handle all HTTPS communication standards and perform a secure handshake and then encrypt and decrypt data automatically.
Katt02@kali$ curl https://inlanefreight.com curl: (60) SSL certificate problem: Invalid certificate chain More details here: https://curl.haxx.se/docs/sslcerts.html ...SNIP... - We may face such an issue when testing a local web application or with a web application hosted for practice purposes, as such web applications may not yet have implemented a valid SSL certificate.
- To skip the certificate check with cURL, we can use the -k flag:
- cURL automatically handle all HTTPS communication standards and perform a secure handshake and then encrypt and decrypt data automatically.
Katt02@kali$ curl -k https://inlanefreight.com
<!DOCTYPE HTML PUBLIC "-//IETF//DTD HTML 2.0//EN">
<html><head>
...SNIP...
- As we can see, the request went through this time, and we received the response data.
Note: Although the data transferred through the HTTPS protocol may be encrypted, the request may still reveal the visited URL if it contacted a clear-text DNS server. For this reason, it is recommended to utilize encrypted DNS servers (e.g. 8.8.8.8 or 1.1.1.1), or utilize a VPN service to ensure all traffic is properly encrypted.
HTTP Requests and Responses
- HTTP communications mainly consist of an HTTP request and an HTTP response.
- An HTTP request is made by the client (e.g. cURL/browser), and is processed by the server (e.g. web server).
- Once the server receives the HTTP request, it processes it and responds by sending the HTTP response, which contains the response code
- HTTP Request:
- The image below shows an HTTP GET request to the URL:
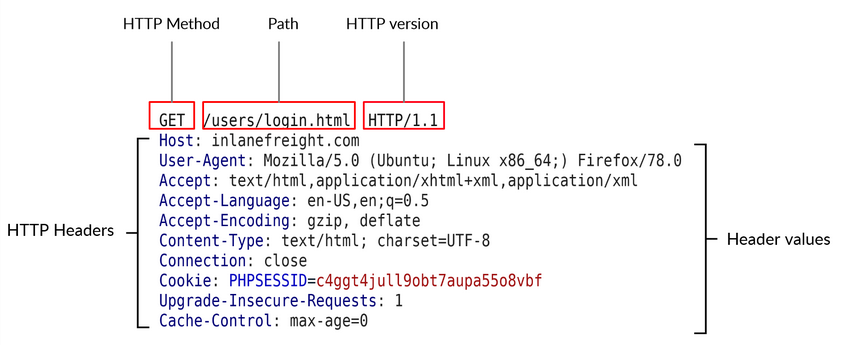
- The image below shows an HTTP GET request to the URL:
- The first line of any HTTP request contains three main fields ‘separated by spaces’:
| Field | Example | Description |
|---|---|---|
| Method | GET | The HTTP method or verb, which specifies the type of action to perform. |
| Path | /users/login.html | The path to the resource being accessed. |
| Version | HTTP/1.1 | The third and final field is used to denote the HTTP version. |
- HTTP Response:
- Once the server processes our request, it sends its response. The following is an example HTTP response:
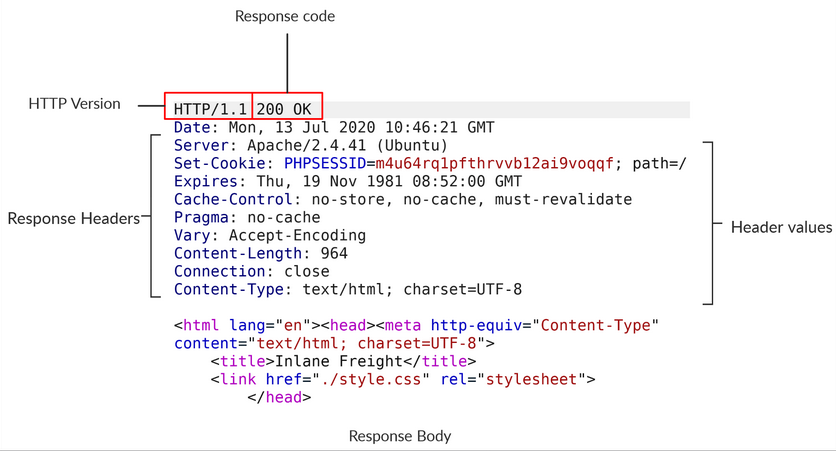
- The first line of an HTTP response contains two fields separated by spaces. The first being the HTTP version (e.g. HTTP/1.1), and the second denotes the HTTP response code (e.g. 200 OK).
- Once the server processes our request, it sends its response. The following is an example HTTP response:
- cURL
- cURL also allows us to preview the full HTTP request and the full HTTP response.
- which is very handy when performing web penetration tests or writing exploits.
- To view the full HTTP request and response, we can simply add the
-vverbose flag to our earlier commands, and it should print both the request and response:
Katt02@kali$ curl inlanefreight.com -v
*   Trying SERVER_IP:80...
* TCP_NODELAY set
* Connected to inlanefreight.com (SERVER_IP) port 80 (#0)
> GET / HTTP/1.1
> Host: inlanefreight.com
> User-Agent: curl/7.65.3
> Accept: */*
> Connection: close
>
* Mark bundle as not supporting multiuse
< HTTP/1.1 401 Unauthorized
< Date: Tue, 21 Jul 2020 05:20:15 GMT
< Server: Apache/X.Y.ZZ (Ubuntu)
< WWW-Authenticate: Basic realm="Restricted Content"
< Content-Length: 464
< Content-Type: text/html; charset=iso-8859-1
<
<!DOCTYPE HTML PUBLIC "-//IETF//DTD HTML 2.0//EN">
<html><head>
...SNIP...
- As we can see, this time, we get the full HTTP request and response.
- The request simply sent
GET/ HTTP/1.1along with theHost,User-AgentandAcceptheaders. - In return, the HTTP response contained the HTTP/1.1 401 Unauthorized, which indicates that we do not have access over the requested resource.
- Similar to the request, the response also contained several headers sent by the server, including
Date,Content-Length, andContent-Type. - Finally, the response contained the response body in HTML, which is the same one we received earlier when using cURL without the
-vflag. -
The
-vvvflag shows an even more verbose output. - Browser DevTools:
- Most modern web browsers come with built-in developer tools (DevTools), which are mainly intended for developers to test their web applications.
- However, as web penetration testers, these tools can be a vital asset in any web assessment we perform, as a browser (and its DevTools) are among the assets we are most likely to have in every web assessment exercise.
- To open the browser devtools in either Chrome or Firefox, we can click
[CTRL+SHIFT+I]or simply click[F12]. - If we click on the Network tab and refresh the page, we should be able to see the list of requests sent by the page:

- As we can see, the devtools show us at a glance the response status (i.e. response code), the request method used (GET), the requested resource (i.e. URL/domain), along with the requested path. Furthermore, we can use Filter URLs to search for a specific request, in case the website loads too many to go through.
Note: HTTP version 1.X sends requests as clear-text, and uses a new-line character to separate different fields and different requests. HTTP version 2.X, on the other hand, sends requests as binary data in a dictionary form
HTTP Headers
- HTTP headers pass information between the client and the server.
- We can divide headers into the following categories:
- General Headers:
- General headers are used in both HTTP requests and responses. They are contextual and are used to describe the message rather than its contents.
Header Example Description Date Date: Wed, 16 Feb 2022 10:38:44 GMT Holds the date and time at which the message originated. Conection Connection: close Dictates if the current network connection should stay alive after the request finishes. Two commonly used values for this header are close and keep-alive. The close value means that they would like to terminate the connection, while the keep-alive header indicates that the connection should remain open to receive more data and input. - Entity Headers:
- These headers are used to describe the content (entity) transferred by a message. They are usually found in responses and POST or PUT requests.
Header Example Description Content-Type Content-Type: text/html Used to describe the type of resource being transferred. The charset field denotes the encoding standard, such as `UTF-8`. Media-Type Media-Type: application/pdf The media-type is similar to Content-Type, and describes the data being transferred. Boundary boundary="b4e4fbd93540" Acts as a marker to separate content when there is more than one in the same message. Content-Length Content-Length: 385 Holds the size of the entity being passed. Content-Encoding Content-Encoding: gzip Data can undergo multiple transformations before being passed. For example, large amounts of data can be compressed to reduce the message size. - Request Headers:
- The client sends Request Headers in an HTTP transaction. These headers are used in an HTTP request and do not relate to the content of the message.
Header Example Description Date Date: Wed, 16 Feb 2022 10:38:44 GMT Holds the date and time at which the message originated. Conection Connection: close Dictates if the current network connection should stay alive after the request finishes. Two commonly used values for this header are close and keep-alive. The close value means that they would like to terminate the connection, while the keep-alive header indicates that the connection should remain open to receive more data and input.
</table>
- The client sends Request Headers in an HTTP transaction. These headers are used in an HTTP request and do not relate to the content of the message.
- Entity Headers:
- These headers are used to describe the content (entity) transferred by a message. They are usually found in responses and POST or PUT requests.
Header Example Description Host Host: www.inlanefreight.com Used to specify the host being queried for the resource. User-Agent User-Agent: curl/7.77.0 The User-Agent header is used to describe the client requesting resources. This header can reveal a lot about the client, such as the browser, its version, and the operating system. Referer Referer: http://www.inlanefreight.com/ Denotes where the current request is coming from.For example, clicking a link from Google search results would make https://google.com the referer. Accept Accept: */* The Accept header describes which media types the client can understand. It can contain multiple media types separated by commas. The */* value signifies that all media types are accepted. Cookie Cookie: PHPSESSID=b4e4fbd93540 Contains cookie-value pairs in the format name=value. A cookie is a piece of data stored on the client-side and on the server, which acts as an identifier. Authorization Authorization: BASIC cGFzc3dvcmQK Another method for the server to identify clients. After successful authentication, the server returns a token unique to the client. Unlike cookies, tokens are stored only on the client-side and retrieved by the server per request. - Response Headers:
- Response Headers can be used in an HTTP response and do not relate to the content.
Header Example Description Date Date: Wed, 16 Feb 2022 10:38:44 GMT Holds the date and time at which the message originated. Conection Connection: close Dictates if the current network connection should stay alive after the request finishes. Two commonly used values for this header are close and keep-alive. The close value means that they would like to terminate the connection, while the keep-alive header indicates that the connection should remain open to receive more data and input. - Entity Headers:
- These headers are used to describe the content (entity) transferred by a message. They are usually found in responses and POST or PUT requests.
Header Example Description Server Server: Apache/2.2.14 (Win32) Contains information about the HTTP server, which processed the request. It can be used to gain information about the server, such as its version, and enumerate it further. Set-Cookie Set-Cookie: PHPSESSID=b4e4fbd93540 Contains the cookies needed for client identification. WWW-Authenticate WWW-Authenticate: BASIC realm="localhost" Notifies the client about the type of authentication required to access the requested resource. - Security Headers:
- At last we have security headers. With the increase in the variety of browsers and web-based attacks, defining certain headers that enhanced security was necessary.
Header Example Description Content-Security-Policy Content-Security-Policy: script-src 'self' Dictates the website's policy towards externally injected resources. This could be JavaScript code as well as script resources. This header instructs the browser to accept resources only from certain trusted domains, hence preventing attacks such as Cross-site scripting (XSS). Strict-Transport-Security Strict-Transport-Security: max-age=31536000 Prevents the browser from accessing the website over the plaintext HTTP protocol, and forces all communication to be carried over the secure HTTPS protocol. Referrer-Policy Referrer-Policy: origin Dictates whether the browser should include the value specified via the Referer header or not. It can help in avoiding disclosing sensitive URLs and information while browsing the website. - cURL
- we saw how using the
-vflag with cURL shows us the full details of the HTTP request and response. -
If we were only interested in seeing the response headers, then we can use the
-Iflag to send a HEAD request and only display the response headers.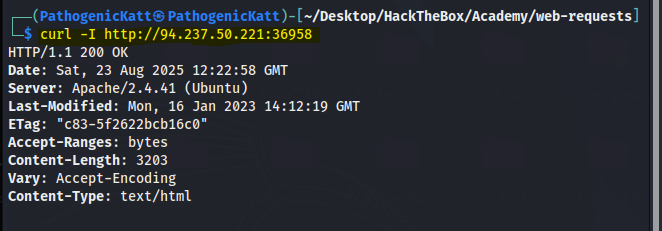
-
We can use the
-iflag to display both the headers and the response body (e.g. HTML code).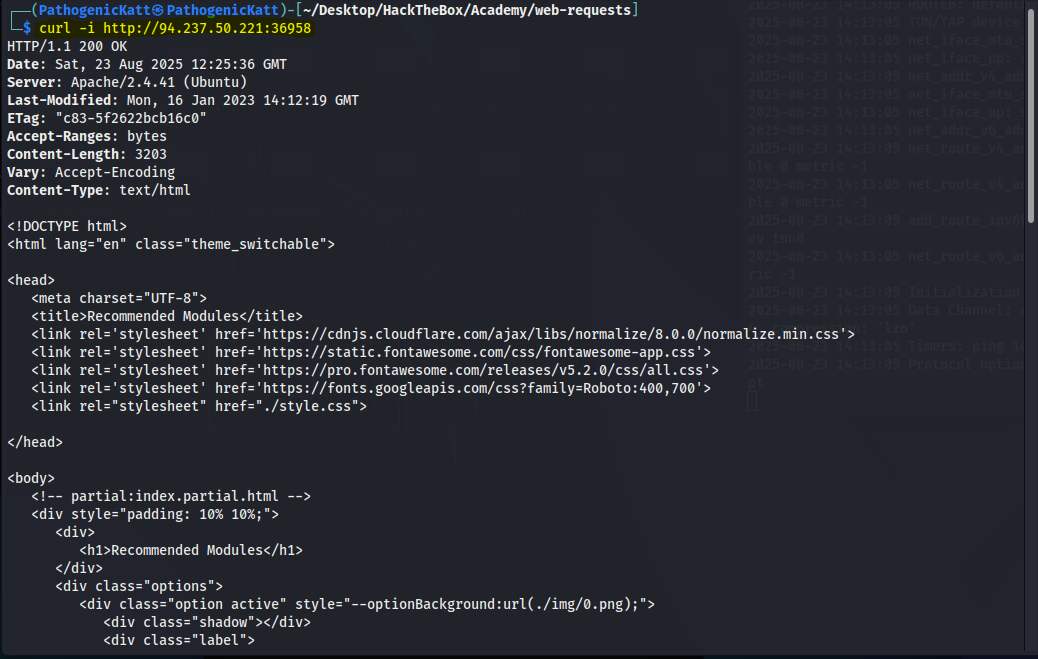
- The difference between the two is that
-Isends a HEAD request (as will see in the next section), while -i sends any request we specify and prints the headers as well.
- we saw how using the
- Browser DevTools
- let’s see how we can preview the HTTP headers using the browser devtools.
- we can go to the Network tab to view the different requests made by the page. We can click on any of the requests to view its details:
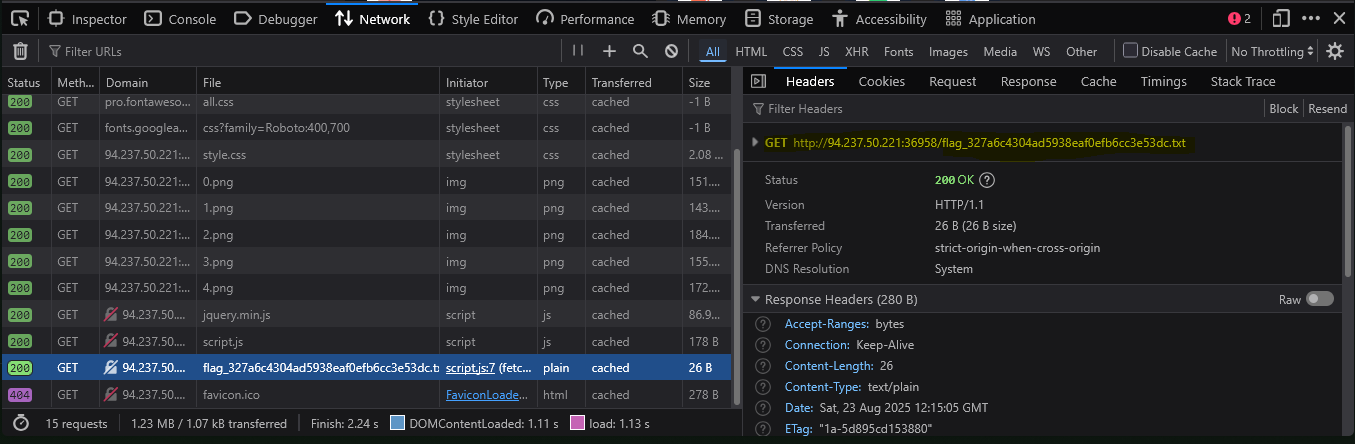
- In the first Headers tab, we see both the HTTP request and HTTP response headers.
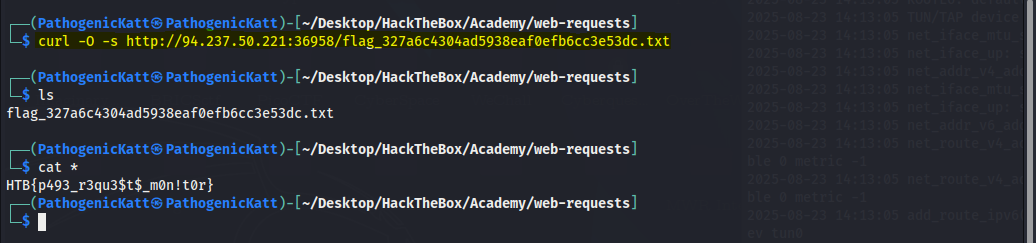
- As a bonus challenge, we see that there is a flag file, let’s see if we can retrieve its contents:
HTTP Methods and Codes
- HTTP supports multiple methods for accessing a resource.
- Request Methods
- The following are some of the commonly used methods:
Method Description GET Requests a specific resource. POST Sends data to the server. Commonly for logins PUT Creates new resources on the server. Allowing this method without proper controls can lead to uploading malicious resources. DELETE Deletes an existing resource on the webserver. If not properly secured, can lead to Denial of Service (DoS) by deleting critical files on the web server. HEAD Requests the headers that would be returned if a GET request was made to the server. It doesn't return the request body and is usually made to check the response length before downloading resources. OPTIONS Returns information about the server, such as the methods accepted by it PATCH Referrer-Policy: origiApplies partial modifications to the resource at the specified location. - Status Codes:
- HTTP status codes are used to tell the client the status of their request. An HTTP server can return five classes of status codes:
Class Description 1xx Provides information and does not affect the processing of the request. 2xx Returned when a request succeeds. 3xx Returned when the server redirects the client. 4xx Signifies improper requests from the client. For example, requesting a resource that doesn't exist or requesting a bad format. 5xx Returned when there is some problem with the HTTP server itself. - The following are some of the commonly seen examples from each of the above HTTP status code classes:
Code Description 200 OK Returned on a successful request, and the response body usually contains the requested resource. 302 Found Redirects the client to another URL. For example, redirecting the user to their dashboard after a successful login. 400 Bad Request Returned on encountering malformed requests such as requests with missing line terminators. 403 Forbidden Signifies that the client doesn't have appropriate access to the resource. It can also be returned when the server detects malicious input from the user. 404 Not Found Returned when the client requests a resource that doesn't exist on the server. 500 Internal Server Error Returned when the server cannot process the request. - GET
- Whenever we visit any URL, our browsers default to a GET request to obtain the remote resources hosted at that URL.
- Once the browser receives the initial page it is requesting; it may send other requests using various HTTP methods.
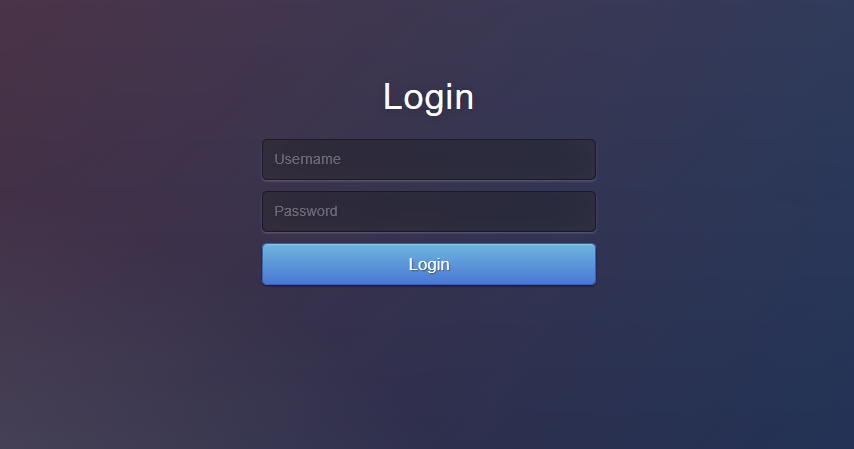
- HTTP Basic Auth
- When we visit the following website, it prompts us to enter a username and a password.
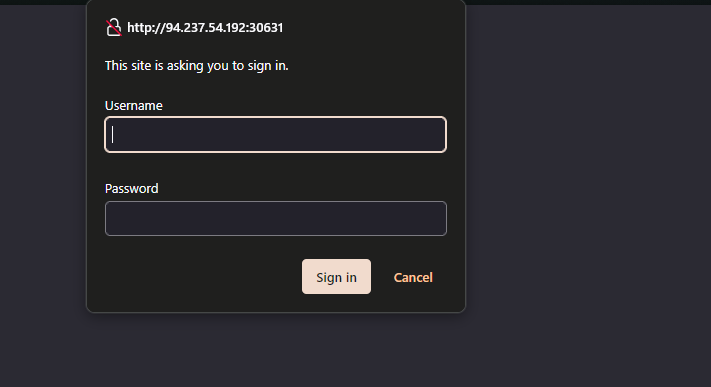
- This type of authentication utilizes a basic HTTP authentication, which is handled directly by the webserver to protect a specific page/directory, without directly interacting with the web application.
- To access the page, we have to enter a valid pair of credentials, which are admin:admin in this case.
- Once we enter the credentials, we would get access to the page:
- Let’s try to access the page with cURL, and we’ll add
-ito view the response headers: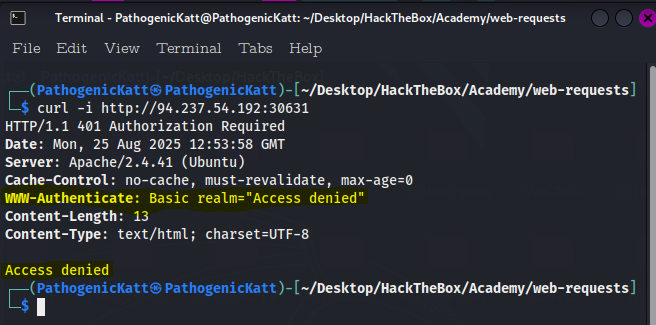
- As we can see, we get Access denied in the response body, and we also get Basic realm=”Access denied” in the WWW-Authenticate header, which confirms that this page indeed uses basic HTTP auth.
- To properly input the credentials on the terminal, we use the
-utag: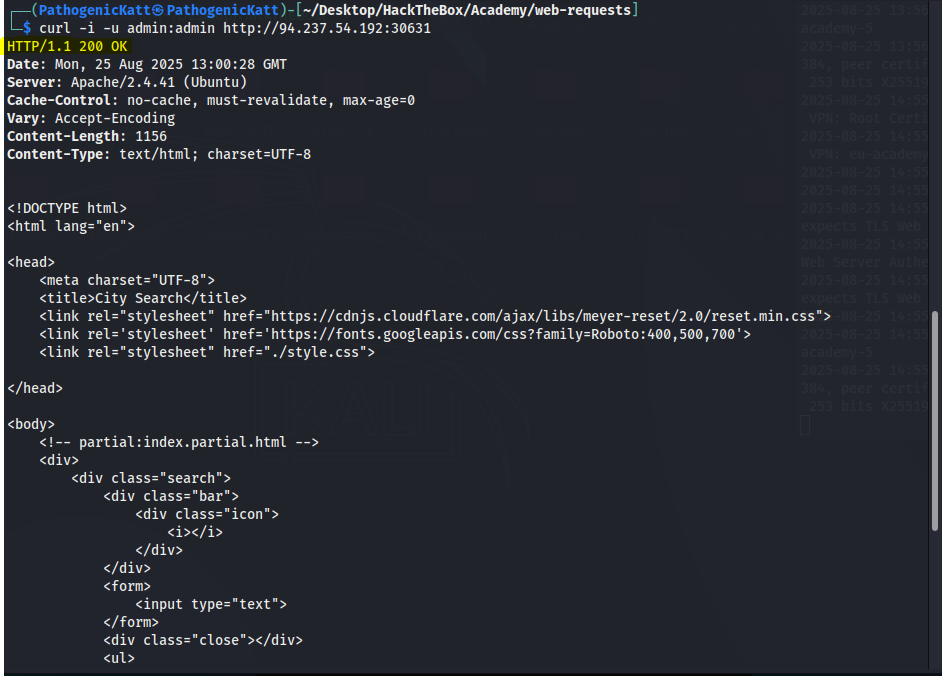
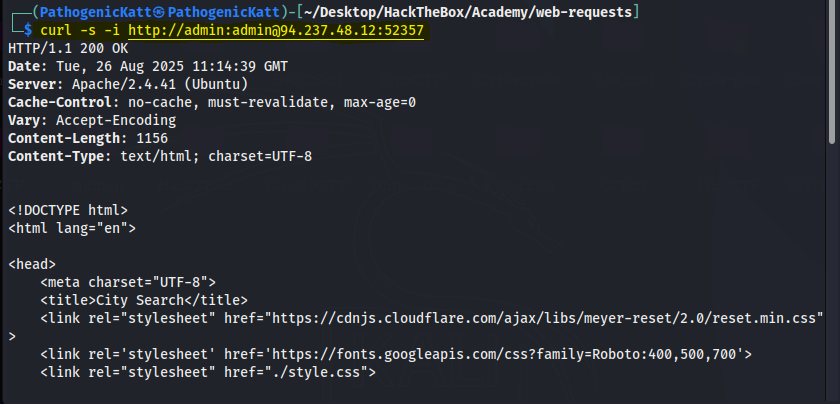
- There is another method we can provide the basic HTTP auth credentials, which is directly through the URL as (username:password@URL). Hence we still get the same results:
- When we visit the following website, it prompts us to enter a username and a password.
- HTTP Authorization Header
- If we add the
-vflag to either of our earlier cURL commands: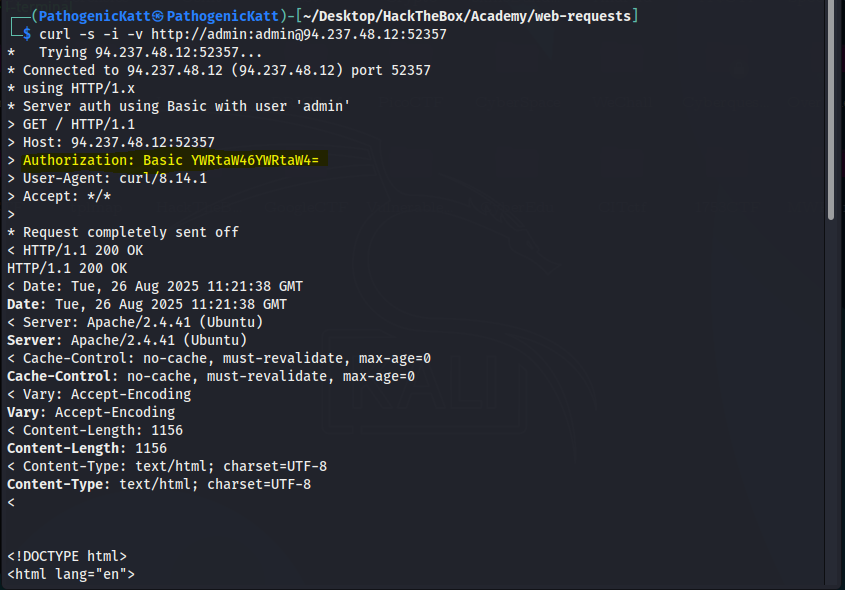
- We see that, we get more information, i mean that is the whole purpose of tag
v, becuase what it means is “verbose”. But in this case what is important is the highlighted part. Using the commands to decode it we get:
- we see that our HTTP request sets the Authorization header to Basic YWRtaW46YWRtaW4=, which is the base64 encoded value of admin:admin.
- If we were using a modern method of authentication (e.g. JWT), the Authorization would be of type Bearer and would contain a longer encrypted token.
- Let’s try to manually set the Authorization, without supplying the credentials, to see if it does allow us access to the page.
- We can set the header with the
-Hflag, and will use the same value from the above HTTP request. - We can add the
-Hflag multiple times to specify multiple headers: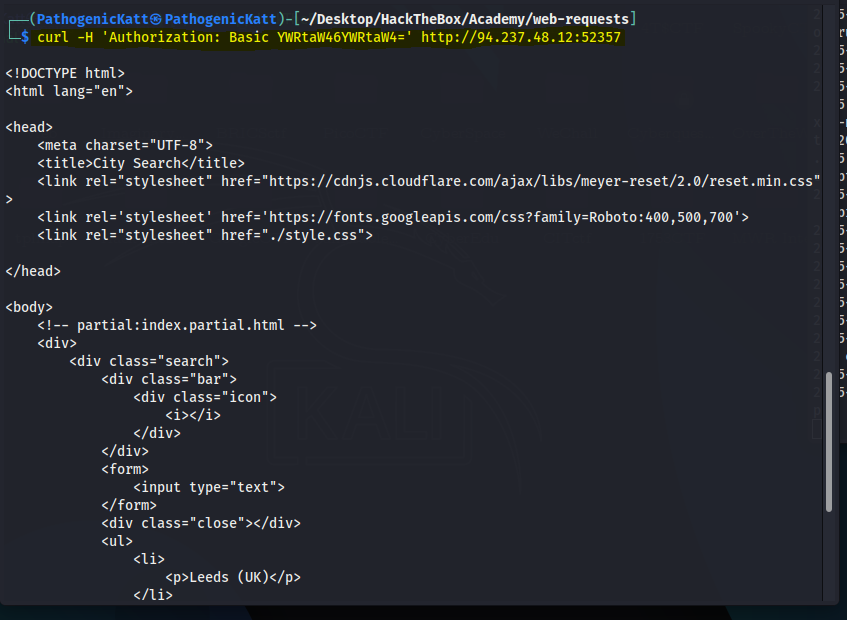
- As we see, this also gave us access to the page.
- If we add the
- GET Parameters:
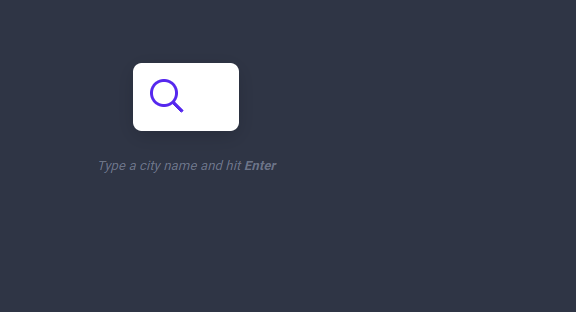
- Once we are authenticated, we get access to a City Search function, in which we can enter a search term and get a list of matching cities:
- Once we are authenticated, we get access to a City Search function, in which we can enter a search term and get a list of matching cities:
- After that, we can enter any search term and hit enter, and we will immediately notice a new request being sent to the backend:
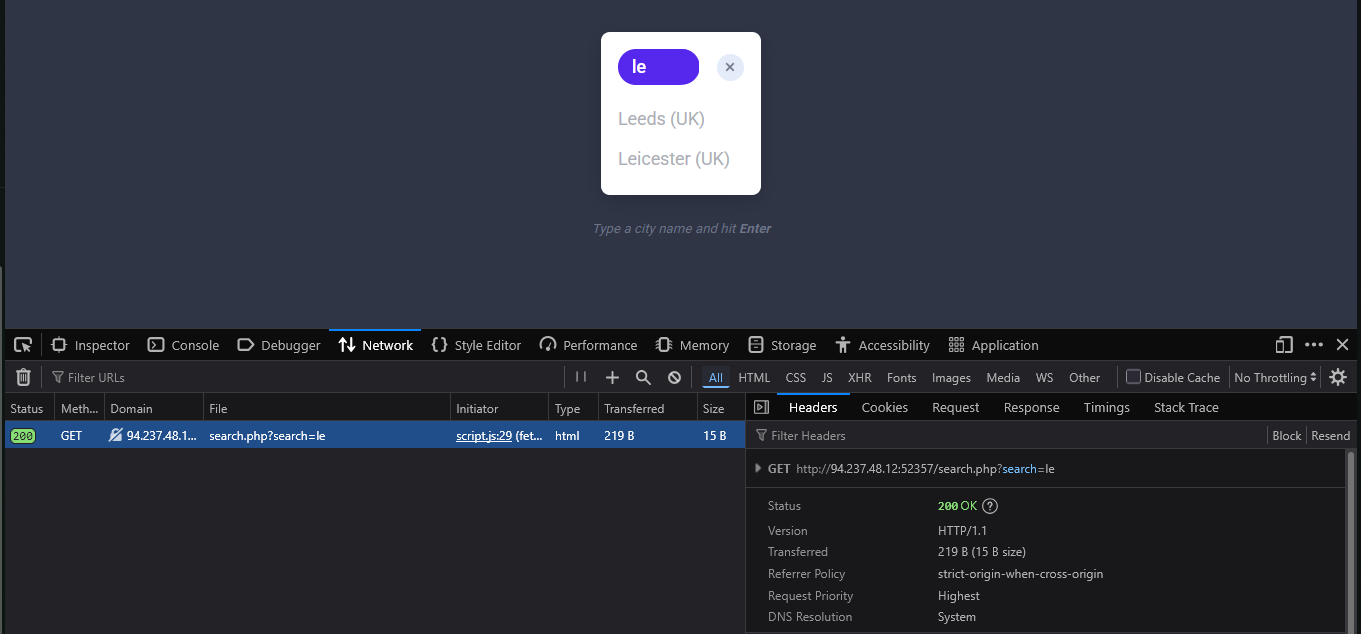
- When we click on the request, it gets sent to search.php with the GET parameter search=le used in the URL. This helps us understand that the search function requests another page for the results.
- To send a GET request with cURL, we can use the exact same URL seen in the above screenshots since GET requests place their parameters in the URL. But we also see notice a clear difference in the output or response:
.PNG)
- The output of the list includes, all the cities that has an “le”, in their name.
- Bonus Challenge:Look for a flag
- Lol, this is me trying to find the flag:
.PNG)
- Using the terminal:
.PNG)
POST
- we saw how GET requests may be used by web applications for functionalities like search and accessing pages.
- However, whenever web applications need to transfer files or move the user parameters from the URL, they utilize POST requests.
- N.B:Unlike HTTP GET, which places user parameters within the URL, HTTP POST places user parameters within the HTTP Request body.
- This has three main benefits:
- So, let’s see some examples of how POST requests work, and how we can utilize tools like cURL or browser devtools to read and send POST requests.
- Login Forms:
- This looks like the same exercise but, we will notice the difference.
- Using the same credentials
admin:adminto login we see the following response:.PNG)
- Again, the respone seems similar to the previous challenge, but this time around we see a logout button at the top-left corner.
- If we clear the Network tab in our browser devtools and try to log in again, we will see many requests being sent.
- We can filter the requests by our server IP(“
domain:94.237.121.92:39835”), so it would only show requests going to the web application’s web server and we will notice the following POST request being sent:.PNG)
- We can click on the request, click on the Request tab (which shows the request body), and then click on the Raw button to show the raw request data. We see the following data is being sent as the POST request data:
.PNG)
- With the request data at hand, we can try to send a similar request with cURL, to see whether this would allow us to login as well:
.PNG)
- Authenticated Cookies:
- If we were successfully authenticated, we should have received a cookie so our browsers can persist our authentication, and we don’t need to login every time we visit the page.
- We can use the -v or -i flags to view the response, which should contain the Set-Cookie header with our authenticated cookie:
.PNG)
- With our authenticated cookie, we should now be able to interact with the web application without needing to provide our credentials every time.
- To test this, we can set the above cookie with the
-bflag in cURL, as follows:.PNG)
- Remember that,
-ijust displays the response header, i like using the tag, because it tells us the status code, which is very important to know. - But as we can see, we were indeed authenticated and got to the search function.
- It is also possible to specify the cookie as a header, as follows:
.PNG)
- We may also try the same thing with our browsers.
- Let’s first logout, and then we should get back to the login page.
- Then, we can go to the Storage tab in the devtools with
[SHIFT+F9]. - In the Storage tab, we can click on Cookies in the left pane and select our website to view our current cookies.
- We may or may not have existing cookies, but if we were logged out, then our PHP cookie should not be authenticated, which is why we get the login form and not the search function:
.PNG)
- Now, let’s try to use our earlier authenticated cookie, and see if we do get in without needing to provide our credentials.
- To do so, we can simply replace the cookie value with our own.
- Then, once our cookie is set, we can refresh the page, and we will see that we do indeed get authenticated without needing to login, simply by using an authenticated cookie.
- As we can see, having a valid cookie may be enough to get authenticated into many web applications. This can be an essential part of some web attacks, like Cross-Site Scripting.
- JSON Data
- Finally, let’s see what requests get sent when we interact with the City Search function.
- To do so, we will go to the Network tab in the browser devtools, and then click on the trash icon to clear all requests.
- Then, we can make any search query to see what requests get sent:
.PNG)
- The POST data appear to be in JSON format, so our request must have specified the Content-Type header to be
application/json:.PNG)
- As we can see, we were able to interact with the search function directly without needing to login or interact with the web application front-end.
- This can be an essential skill when performing web application assessments or bug bounty exercises, as it is much faster to test web applications this way.
CRUD API:
- We saw examples of a City Search web application that uses PHP parameters to search for a city name in the previous sections.
- This section will look at how such a web application may utilize APIs to perform the same thing, and we will directly interact with the API endpoint.
- APIs:
- There are several types of APIs.
- Many APIs are used to interact with a database, such that we would be able to specify the requested table and the requested row within our API query, and then use an HTTP method to perform the operation needed.
- For example, for the
api.phpendpoint in our example, if we wanted to update the city table in the database, and the row we will be updating has a city name of london, then the URL would look something like this:curl -X PUT http://<server-link>:<port>/api.php/city/london
- CRUD:
- As we can see, we can easily specify the table and the row we want to perform an operation on through such APIs.
- Then we may utilize different HTTP methods to perform different operations on that row.
- In general, APIs perform 4 main operations on the requested database entity:
| Operation | HTTP Method | Description |
|---|---|---|
| Create | POST | Adds the specified data to the database table. |
| Read | GET | Reads the specified entity from the database table. |
| Update | PUT | Updates the data of the specified database table. |
| Delete | DELETE | Removes the specified row from the database table |
- These four operations are mainly linked to the commonly known CRUD APIs, but the same principle is also used in REST APIs and several other types of APIs.
- Read:
- The first thing we will do when interacting with an API is reading data.
- we can simply specify the table name after the API (e.g. /city) and then specify our search term (e.g. /london), as follows:

- We see that the result is sent as a JSON string.
- To have it properly formatted in JSON format, we can pipe the output to the
jqutility, which will format it properly. - We will also silent any unneeded cURL output with
-s, as follows:.PNG)
- As we can see, we got the output in a nicely formatted output. We can also provide a search term and get all matching results:
.PNG)
- Finally, we can pass an empty string to retrieve all entries in the table:
.PNG)
- Create:
- To add a new entry, we can use an HTTP POST request, which is quite similar to what we have performed in the previous section.
- We can simply POST our JSON data, and it will be added to the table.
- As this API is using JSON data, we will also set the Content-Type header to JSON, as follows:
.PNG)
- Now, we can read the content of the city we added (Joburg), to see if it was successfully added:
.PNG)
- As we can see, a new city was created, which did not exist before.
- Update:
- Now that we know how to read and write entries through APIs, let’s start discussing two other HTTP methods we have not used so far:
PUTandDELETE. - As mentioned at the beginning of the section, PUT is used to update API entries and modify their details, while
DELETEis used to remove a specific entity. - Using PUT is quite similar to POST in this case, with the only difference being that we have to specify the name of the entity we want to edit in the URL, otherwise the API will not know which entity to edit.
- So, all we have to do is specify the city name in the URL, change the request method to PUT, and provide the JSON data like we did with POST, as follows:
.PNG)
- We see in the example above that we first specified /city/london as our city, and passed a JSON string that contained “city_name”:”Cape Town” in the request data. So, the london city should no longer exist, and a new city with the name Cape Town should exist. Let’s try reading both to confirm:
.PNG)
- We get an empty array, But below we see that Cape-Town exists.
.PNG)
- Now that we know how to read and write entries through APIs, let’s start discussing two other HTTP methods we have not used so far:
- DELETE
- Finally, let’s try to delete a city, which is as easy as reading a city.
- We simply specify the city name for the API and use the HTTP DELETE method, and it would delete the entry, as follows:
.PNG)
- As we can below, after we deleted Cape-Town, we get an empty array when we try reading it, meaning it no longer exists.
.PNG)
- Also note the difference to when i have used the silent tag
-s - Bonus Challenge:
.PNG)
- With this, we are able to perform all 4 CRUD operations through cURL.
Note: The HTTP PATCH method may also be used to update API entries instead of PUT. To be precise, PATCH is used to partially update an entry (only modify some of its data “e.g. only city_name”), while PUT is used to update the entire entry. We may also use the HTTP OPTIONS method to see which of the two is accepted by the server, and then use the appropriate method accordingly. In this section, we will be focusing on the PUT method, though their usage is quite similar.
Tip: Many login forms would redirect us to a different page once authenticated (e.g. /dashboard.php). If we want to follow the redirection with cURL, we can use the -L flag.